

Imagine that you’ve been working on the SEO of a website for a while and one day you decide to redesign it to modernize its look.
One common trigger for considering a website migration is switching from GoDaddy to a new hosting provider. This switch can be motivated by the desire for better performance, affordability, or enhanced features that alternative providers offer.
The new website is stunning. Much more eye-catching and intuitive than the previous one.
But suddenly, you start to see how your traffic begins to drop overnight.
Years of work gone to waste in just a few hours!
This situation, which may seem exaggerated to you, is more common than you think.
I’ve seen it hundreds of times. Clients who have made significant changes to their websites and start to experience major losses in their businesses because they didn’t consider a series of factors.
To prevent this from happening to you, in this post I will provide you with a checklist to migrate a website without affecting its SEO.
Let’s go!
What is an SEO Migration and Why Should We Do it Carefully?
An SEO migration is the process we follow to maintain all web positioning factors of a site after making substantial changes to it.
A change in hosting, domain, structure, or simply a redesign of your website are delicate tasks that can affect how it is interpreted by search engines.
A well-executed SEO migration ensures that the rankings of our pages on Google, and consequently their visibility and the traffic they receive, do not suffer any deterioration.
Most Common Types of SEO Migration
You might wonder, if it’s such a risky process, why take the risk of performing a website migration?
Actually, there are several reasons why you might want to do this. Here are the most common ones:
- Migration due to hosting change. This is the most common and generally the simplest since the website doesn’t undergo substantial changes. It might be motivated by the need for a server with better performance or one that is more cost-effective.
- Migration due to domain change. This is usually due to a rebranding that requires changing the name of the company or the project.
- Migration due to platform change. To take advantage of the specific functionalities of a new CMS or other technology. For example, switching from WordPress to Shopify.
- Migration due to structural change. With the aim of improving the web architecture of our site to make it more organized and accessible.
- Migration due to redesign. To improve the aesthetics of the website or the user experience.
Any of these operations should be carried out with caution, but some are more critical than others in terms of SEO.
Specifically, you should pay special attention to those that involve changes to the URLs, such as domain migrations or changes to the web structure. You need to ensure that Google properly handles these new URLs and transfers all the authority that the old ones had.
Step-by-Step Guide to Seamlessly Perform an SEO Migration of a Website
It’s time to get down to work and see how to carry out an SEO migration.
But first, let me clarify something.
An SEO migration is not a complex process, but it is very detail-oriented.
Every task must be executed with complete attention, as a small oversight can have significant implications on the final web positioning.
That’s why you’ll see that we’ll perform several checks throughout the process to ensure everything works correctly.
I also need to tell you that in this list, I will focus exclusively on SEO-related aspects.
For the technical part of the web migration (moving the website to a new server, changing the domain, modifying the CMS, etc.), you should consult other specific guides or seek the help of a professional to handle it.
That said, let’s get to the list of tasks you shouldn’t overlook when performing an SEO migration.
Preparation for the SEO Migration
In a web migration, there is no room for improvisation. We must plan it in advance and ensure we have all the necessary elements to carry it out properly.
Here is everything you need to verify before the migration time arrives.
1. Choose an optimal day for the migration
Although it may seem obvious, the first step to preparing your web migration is to choose a day to perform it.
But this date shouldn’t be chosen lightly; rather, you should ensure it impacts your results as little as possible.
Consider the seasonality of your website and choose a time when you know for certain that your traffic won’t be high.
If you’re unsure, Google Analytics, Google Search Console, and even Google Trends reports can help you identify those periods when your website has lower demand.

The time of day is also important. Your website may have peaks in visits depending on the time zone, so make sure to adapt to your users’ habits.
And remember, things might not go smoothly on the first try.
Keep in mind that the process can take several hours and set aside a reasonable amount of time in advance.
2. Thoroughly review your new domain
If the migration is to a new domain, review it to ensure it is not penalized.
You’ve probably done this before deciding to buy it, but it doesn’t hurt to do an extra check.
On the Wayback Machine page, you can see if the domain has had any previous content or if it is completely new.
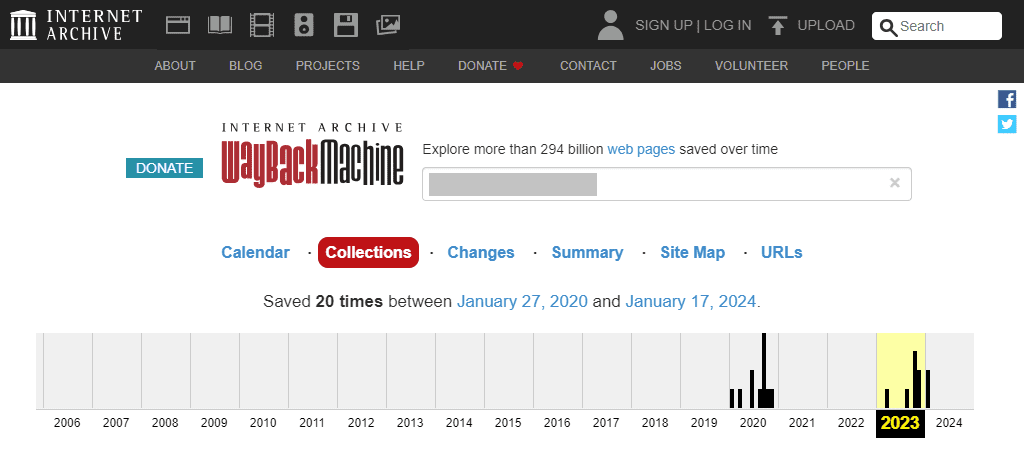
If you come across websites with questionable content, it’s better not to use that domain for your project.
On the other hand, if you bought the domain because it was expiring and you wanted to take advantage of its authority, there are two things you need to know:
First, which pages are still indexed. You can find out by typing the command “site:”, followed by the domain name in Google.
Second, the quality backlinks it might have. You can check this using tools like Ahrefs, Semrush, or DinoRANK itself.
Write down all this information because you will need it later.
3. Perform an SEO audit of your old website
If you’ve been concerned about your website’s SEO, you probably conduct audits regularly.
Well, when planning a website migration, it is essential to perform an SEO audit of the site to ensure everything is in order.
This way, you will crawl all the URLs of your website to verify that they all respond correctly, that redirects are working, and that everything that should be indexed is marked as such.
If you see any errors, now is the time to fix them.
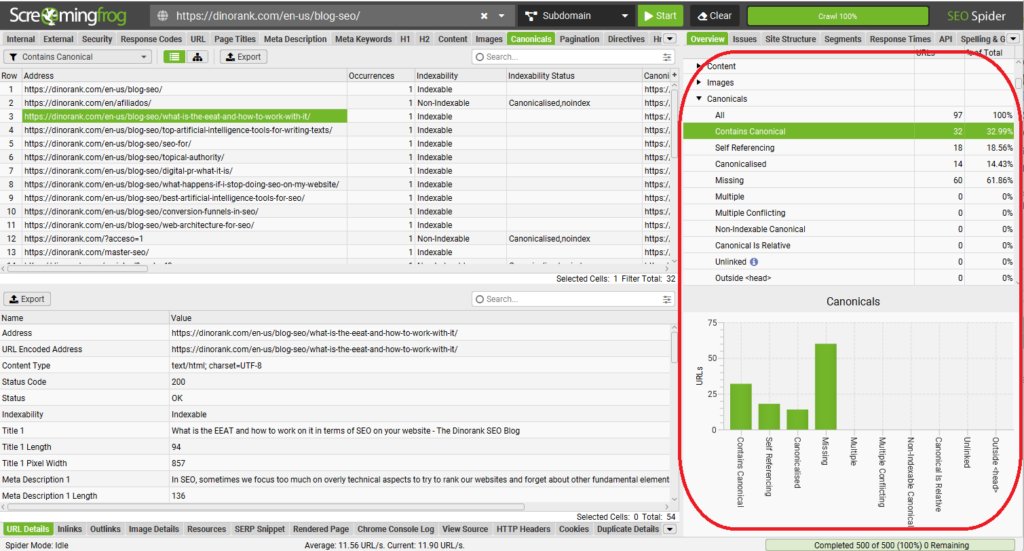
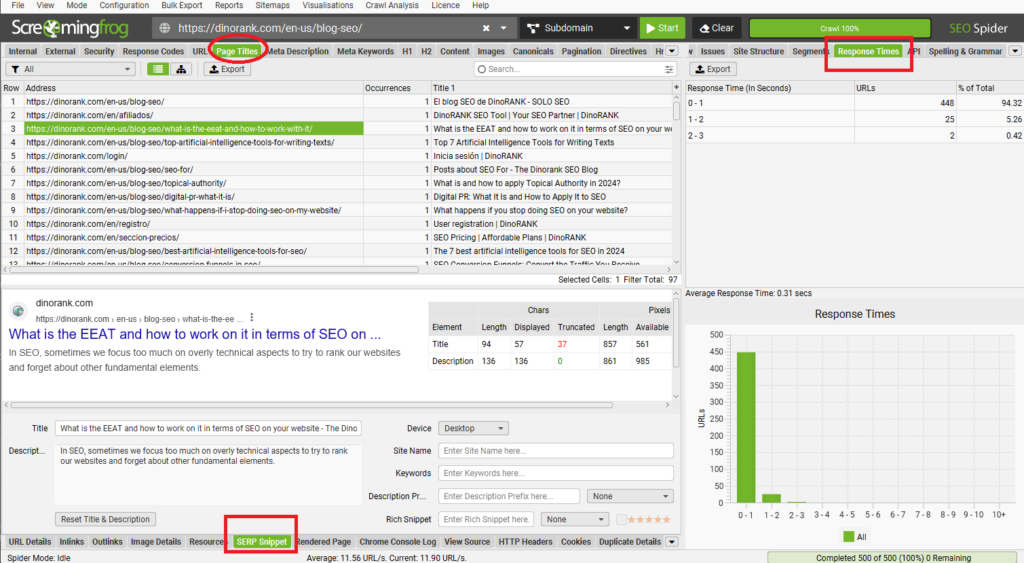
To perform an SEO audit, you can use many tools. I typically use Screaming Frog because the way it displays and exports information is very practical for the tasks that will come next.
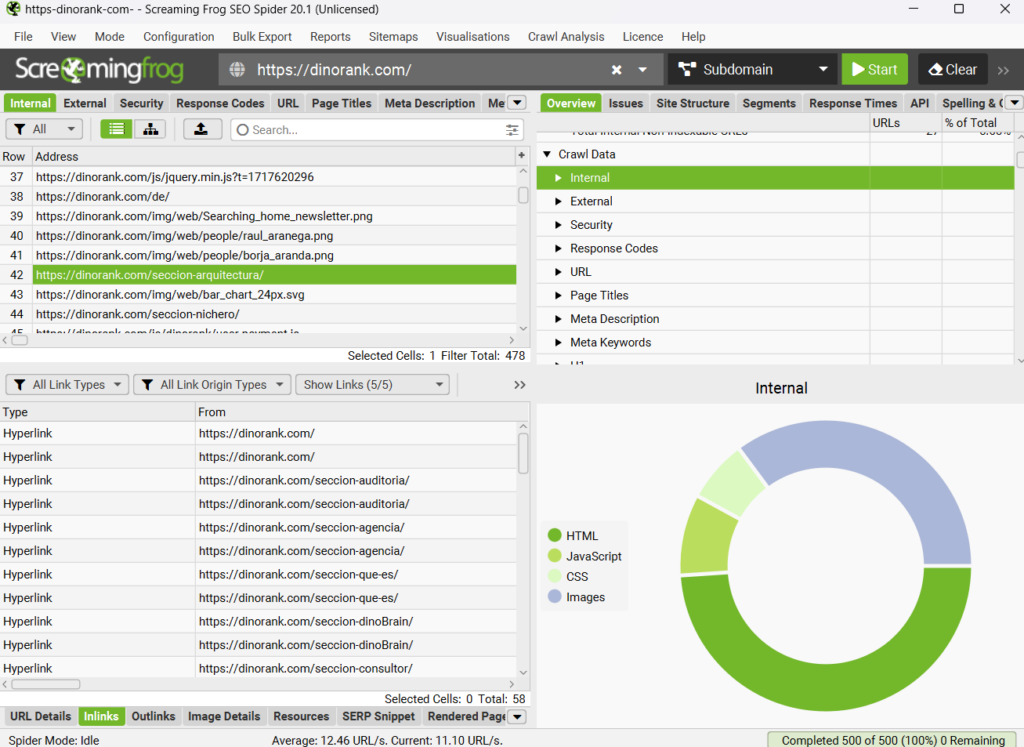
4. Review internal links
A very important part of the previous SEO audit involves checking that you don’t have any broken links. Internal linking is essential for guiding search engine robots, and we can’t afford 404 errors that hinder their work.
As you can see in the previous Screaming Frog screenshot, with this tool you can easily analyze the internal links of any URL and filter them based on their location on the page (whether they’re in the menu, in the body of the text, etc).
Additionally, you have the option to export all the internal links of a website.

Take advantage of this bulk export to save them in an Excel file and use it for checks later on.
5. Always make a backup
When planning a migration of your website, having a copy of your data is vital to roll back if something goes wrong.
To make this backup of your website, you can use different tools depending on the technology your site is built with.
Specifically, if you use WordPress, a plugin that usually works very well is “All-in-One WP Migration.”

You can also manually back up by copying all the files from the server and exporting the databases.
Moreover, most hosting services perform daily backups that can save you from a disaster.
In short, use the method that is most convenient for you but always have a backup handy just in case.
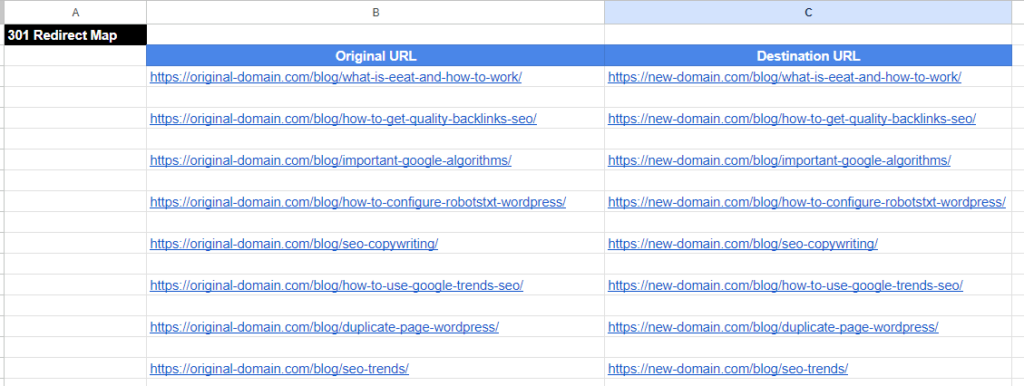
6. Create your SEO redirect map
The 301 redirect map is one of the most important tools in an SEO migration. It will ensure that all our URLs remain accessible and we don’t lose their ranking.
This task is essential when we make modifications to our URLs, whether due to a migration caused by a change in domain or website structure.
To create it, simply export the list of URLs using tools like Screaming Frog and copy them into one column of an Excel file. In the other column, write the destination URL to which you want to redirect each of them.
Remember when we talked about indexed pages or those receiving links on expired domains?
It’s time to include them in this table as well and decide if we want the visits to be redirected to another URL on our site to maintain their authority.
7. Review external links
We can’t forget about backlinks or external links we receive from other websites.
DinoRANK, for example, includes a link building module that allows us to identify all the links pointing to our website.
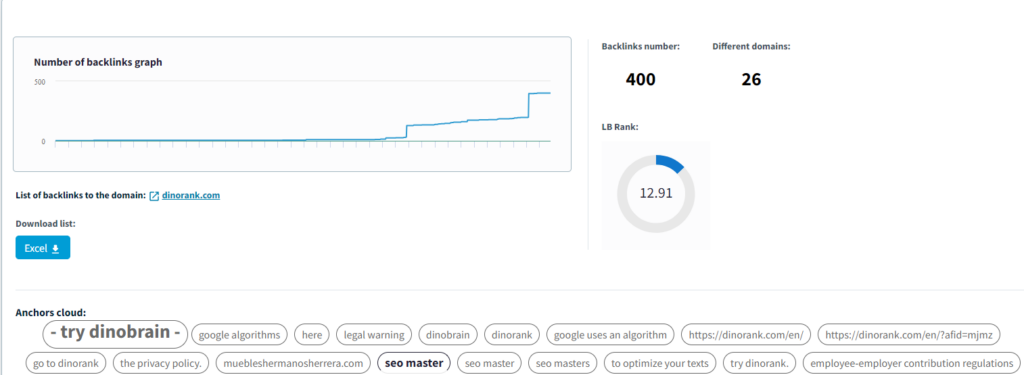
The destination pages of these backlinks have special importance for our site’s authority. If we change their URL, the external link could result in a 404 error and stop serving its purpose.
Therefore, when planning a migration, make sure that all destination URLs of an external link are included in the redirect map. This way, you ensure that your domain retains a fully functional link that transmits authority and brings traffic to the correct URL.
8. Manage 404 errors
Even though we try to avoid them, there are always 404 errors that might slip through.
At this point, you need to have a defined plan to address them.
A strategy can consist of redirecting all errors to a specific page on our website, such as the homepage. This way, there will always be a response so that Google and the user can keep navigating.
Another option would be to create a custom 404 page.

On this page, besides notifying about the problem, we can place links to strategic parts of our website to redirect visitors to the URLs that interest us the most.
9. Use a staging server for the new website
Never make significant changes directly on the live version of the website.
Before proceeding with the migration, you should ensure that everything works correctly in a controlled environment created specifically for this purpose.
You can set up a staging server on a test domain or a subdomain of your website. The goal is to avoid affecting your main site.
I can only think of one situation where it might make sense to work on the final server: when you are changing the domain.
In that case, you can set up the new site on the final hosting service and not make it public until it is completely ready.
10. Tell Google not to index your site
Regarding the previous point, when you are developing a new website, you should tell Google and other search engines not to crawl or index it.
Otherwise, they could enter your pages at any time and misclassify them because they are not yet finished.
If you use WordPress, you can activate the No Index tag on all pages of the website.
You can also configure it easily in the robots.txt file with the directive shown in the image:
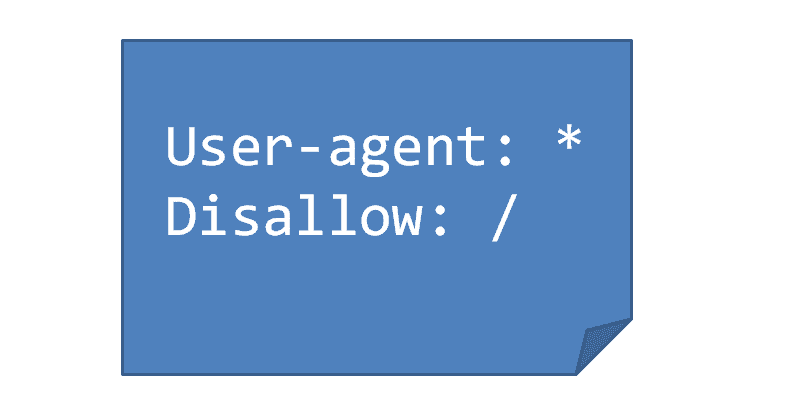
This way, you will ensure that your website will only be considered when it is ready.
Executing the SEO Migration Process
The day has arrived.
We have organized everything properly, and it’s time to migrate our website.
To ensure everything goes smoothly, here is the list of tasks that you should complete.
11. Configure Your DNS
Depending on the type of migration you are undertaking, you will need to configure the DNS so that the domain points to the appropriate server.
For example, if you are changing hosting providers, this step is essential.
On the other hand, if you are working on a new domain, you have likely already completed this operation when you registered the domain and started working on your new website.
In any case, you should know that the propagation of changes in DNS records can take anywhere from a few seconds to several hours to complete. Keep this in mind when planning the date of your SEO migration.
12. Implement 301 Redirects
It’s time to implement the 301 redirects from our SEO redirect map.
This task, which might seem complicated, is actually not that difficult, as there are many tools that make the job easier.
For WordPress, there are several plugins you can use. One of them is “Redirection,” which allows you to import a set of redirects in bulk.

This way, you can export your Excel file with redirections to CSV and import it directly into your WordPress with just a couple of clicks.
But there’s still something left to do.
Now we need to check that all the redirections are working and that there are no 404 errors. We’ll cover this in the next task.
13. Crawl your website after the migration
We conducted a site audit before the migration, and now we’ll do another audit to ensure everything is still on track.
With Screaming Frog, we’ll check that the URLs are correct, redirect to the correct places, and do not return error codes.

We’ll also make sure the pages we want to rank are marked as indexable.
Additionally, we’ll verify the internal links. For this, we’ll start with the export we obtained during the previous phase to ensure we haven’t lost any links during the migration.
It’s important that internal links do not have a redirection, as this can affect the website’s speed. Therefore, whenever possible, we will replace our internal links with their final URL on all the pages where they appear.
Finally, we’ll check the destination pages of the backlinks we receive, at least the most significant ones, to ensure we maintain our authority.
14. Review the canonical tags
As part of the previous SEO audit, we need to pay special attention to the canonical tags.
A poorly placed canonical tag can be a source of SEO problems.
That’s why it’s important to review all the canonical tags on your website and make sure they point to the correct URLs.
With Screaming Frog, you can check this quite easily.
15. Update the Sitemap.xml and Robots.txt
Once we’ve confirmed that everything is in order, it’s time to make our new website public and allow search engines to crawl it.
To do this, remove the No Index attribute from the pages and update the Robots.txt file with the appropriate directives so that Google knows which parts it can visit and which ones it can’t.
Additionally, check the Sitemap (sitemap.xml file) and make sure it contains everything you want to index.
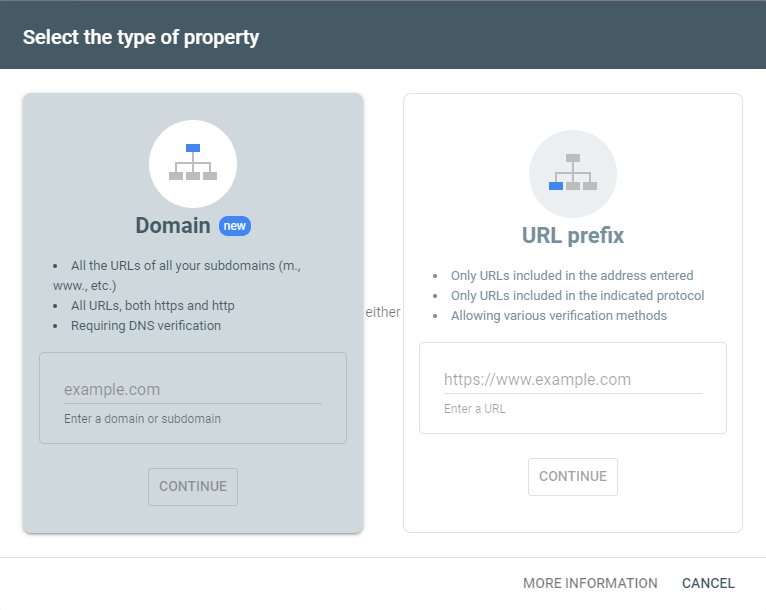
16. Notify Google Search Console of your changes
Finally, you just need to inform Google that you’ve modified your website. Here are a few scenarios:
- If your URLs haven’t changed, you don’t need to do anything at this point.
- If you’ve modified your website structure, you’ll need to upload the new Sitemap to Google Search Console so it can process it.
- If you’ve migrated your website to a new domain, you’ll need to register the new domain property in GSC.
This way, after a few days, the changes will start to become visible on Google.
Essential tasks after an SEO migration
Congratulations! You’ve successfully migrated your website and managed the SEO factors.
But the work doesn’t end here.
Now it’s time to check that everything is working correctly and to continue doing so in the days following the migration.
17. Conduct an SEO audit of the new website
Can you guess what’s next?
Exactly! A new website audit.
Remember that audits are processes you should perform periodically to ensure your website’s performance from an SEO perspective.
*If you want to do SEO audits, visit this page.
In this case, it should be more thorough than the one you did during the migration and look at details you might have overlooked before because they had a minor impact.
Besides checking for any errors in the URLs, it would be good to take a look at elements like meta tags, structured data, or the page loading speed.
These are factors that influence ranking and you need to take care of them if you want your website to maintain its relevance at all times.
18. Monitor everything you can
The days following a migration are critical in determining if it has had any impact, especially if it negatively affects the website.
That’s why, for a while, you should periodically check the status of your page indexing and the volume of visits received.
A daily check of Google Search Console and Google Analytics, first thing in the morning, can be crucial to detect problems and address them before they have bigger consequences.

19. Update external links from other websites
A significant part of your site’s visibility and traffic comes from its external links.
If you’ve changed your URLs, you need to ensure these links are still working.
Thanks to the 301 redirects you implemented during the migration, this shouldn’t be a problem.
However, it’s always better to have a direct link rather than a redirect.
So, if you have control over the link, I recommend updating it to point directly to the correct URL. This would be the case, for example, with your social media profiles or your Google My Business listing.
20. Decide what to do with the old domain and hosting
Once a reasonable amount of time has passed and you’ve ensured that the SEO migration of the site has been successful, it’s time to decide what to do with the old resources.
Specifically, if you’ve migrated hosting and are no longer using the old one, you can cancel it without any issues. This will save you a cost that you no longer need to incur.
But with domains, it’s a different story. If the migration involved a domain change, you should not cancel the old domain.
Remember that many links might still point to the old domain, and it is the one that helped you gain some of the popularity you have now.
Therefore, keep your old domain to ensure all links redirect correctly and maintain the authority it has transferred to you up to this day.
Conclusions about SEO migrations
If you’ve ever moved houses, you’ll agree with me that it’s a task that can give you more than a few headaches.
Finding a day to do it, packing things in boxes, ensuring nothing breaks during transport, and putting everything back where it belongs…
In the digital world, migrating a website is the closest thing to moving house that you can find.
You need to stay well-organized if you don’t want any unpleasant surprises. And a drop in SEO ranking can be one of those undesirable effects you definitely want to avoid.
To prevent this, in this article I’ve highlighted the most important points you should review in any SEO migration. I recommend bookmarking it and revisiting it whenever you face a significant change on your website.
I am convinced that if you apply what we’ve covered in this article, you’ll be able to handle any type of website migration with the highest chances of success.
