Are you starting in SEO and want to learn how to get your web pages to show up in search results?
You should know that a key part of this process is having a well-configured sitemap. This way, Google’s robot will know which URLs on your website it should show to users.
Setting up and submitting a sitemap might seem like a daunting task at first.
However, in this article, I’ll show you that it’s easier than you think thanks to plugins that help configure it without the need for technical and programming knowledge; the first step will be knowing which options to activate.
Therefore, in this article, you will learn how to configure a sitemap step by step like a true professional.
But first, I’ll start by defining this SEO concept in more detail:
What is an XML Sitemap and what is it for?
An XML Sitemap is a file that lists the URLs of your website that you want search engines to index and show to users.
- If a URL is not in the sitemap, it is harder for Google to show it to users in search results.
This XML file contains a series of data about each page, such as the modification date or the number of images each one contains.
Additionally, a sitemap is usually organized into several site maps, based on the structure of your website. This helps Google better understand the architecture of your domain, resulting in better positioning.
A common way to present a sitemap is as follows:

XML is not the only type of sitemap that exists. Some websites show their users a sitemap in HTML format.
Below, you can see the differences between the two:
Differences Between an XML Sitemap and an HTML Sitemap
While XML is aimed at helping search engines understand the structure of the website and the URLs they can show, HTML is a page created with the goal of guiding the user through your website.
The HTML sitemap itself is usually not very useful for search engines.
To better understand the difference between the two, here is an example of an HTML sitemap:
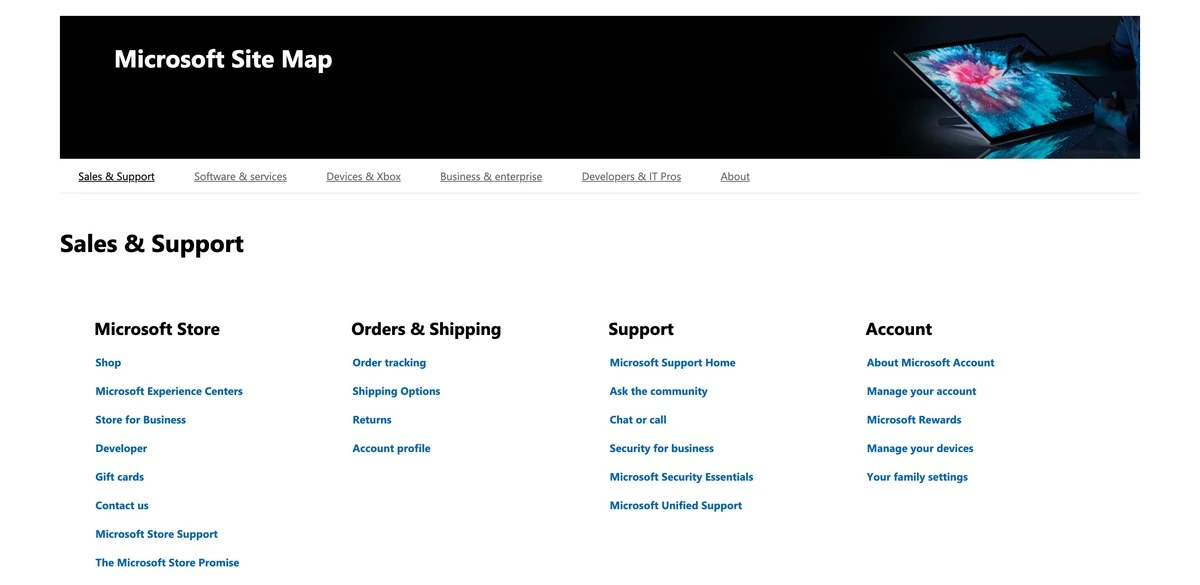
As you can see, this is an intuitive and visual page, unlike the sitemap.xml, which does not seek to satisfy the user experience.
- For search engines.
- XML format (tags like <urlset>, etc.).
- Not directly visible to users.
- Directly improves SEO crawling.
- For users.
- HTML format (web page with links).
- Visible and navigable by users.
- Indirectly improves SEO.
The main advantage of the XML format is that it offers a series of positive SEO points, which I detail below:
What Are the SEO Benefits of Configuring a Sitemap
The main benefits of properly configuring the sitemap are:
- Search robots go directly to the URLs you want to show them, thus avoiding analyzing unnecessary pages one by one.
- Search engines will know the frequency with which you update your website and will record the changes.
- The XML sitemap will indicate to crawlers which URLs are the most important on your site so they index what you want.
- It does not affect the usability of your website at all, as it is oriented towards search engines and not the user.
To achieve all these benefits, your website’s sitemap must be well configured. Below is a tutorial to adjust your website’s sitemap like a PRO.
How to Configure an XML Sitemap Step by Step
When it comes to configuring an XML sitemap, you might imagine it as a complex and impossible task for someone without advanced technical SEO knowledge.
But the reality is that, if your website is on WordPress, you only need to follow these steps to have a fully functional XML sitemap:
Step 1: Download the ‘XML Sitemap Generator for Google’ Plugin
There are many WordPress plugins that help you generate a functional sitemap. In this case, I will use XML Sitemap Generator for Google, one of the most installed and highly rated for site map management.
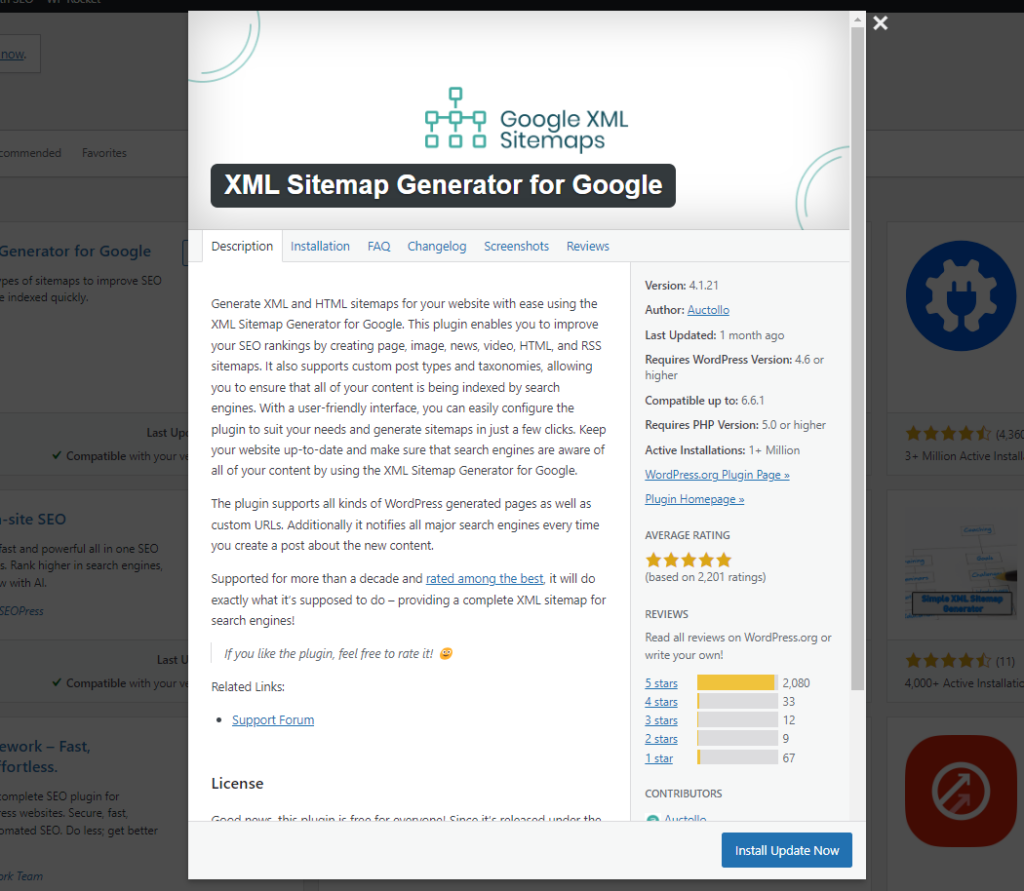
You will need to install and activate it to use it. There are also other plugins that are very good for generating sitemaps, such as Yoast SEO or Rank Math.
Step 2: Basic XML Sitemap Configuration
To access the configuration of this plugin, hover over the settings tab and click on XML Sitemap.
Here you will find the “Basic Options,” where you will see that all the boxes are checked by default:

- Use the IndexNow protocol to notify search engines like Microsoft Bing, Seznam.cz, Naver, and Yandex about updates to your site:
This option allows your site to automatically notify these search engines when there are updates to your content, which can speed up the indexing process.
I recommend enabling this, except if you constantly make non-final changes that you don’t want search engines to see until you specify.
In the “Sitemap Content” section, you can select which elements you want to include in your XML sitemap.
It is recommended to set it up just like in the image, to avoid overloading the sitemap with too much information.
- Add the sitemap URL to the virtual robots.txt file:
By enabling this option, the sitemap URL will be automatically added to WordPress’s robots.txt file.
Keep in mind that search engines also use the robots.txt to find the sitemap via the Sitemap Autodiscovery system, so this option helps search engines find your sitemap more effectively.
If you already manage your website’s robots.txt manually, you don’t need to check this option.
Step 3: Advanced XML Sitemap Configuration
Once you’ve determined what to check in those two options, you will proceed to cover a more advanced configuration.
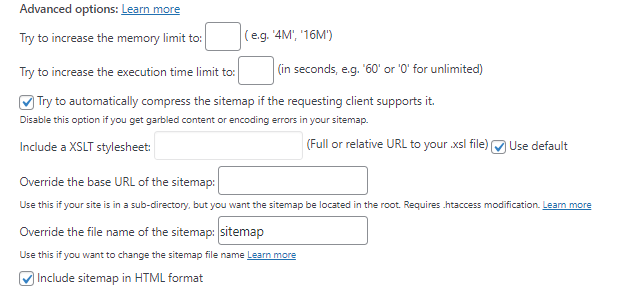
I’ll explain what each option does so that you can configure it as tailored to your website as possible:
- Try to increase memory limit to:
Allows increasing the PHP memory limit used by WordPress to generate the sitemap.
This is used to prevent resource overload errors, which is useful for large sites. You need to specify the value in megabytes (for example, ‘4M’ or ’16M’).
In this case, if your website is medium or small, I recommend avoiding complications and leaving this option blank.
- Try to increase execution time limit to:
This box allows you to determine the execution time limit for generating the sitemap. It is specified in seconds (for example, ’60’ for one minute) or ‘0’ for unlimited.
It is useful for websites with many pages whose sitemap faces complications when gathering all of them. If this is not your case, it might be better to disregard this field.
- Attempt to automatically compress the sitemap if the requesting client supports it:
When you enable this option, the sitemap will be compressed in gzip format if the browser or search engine requesting it can handle compression. This reduces load time and bandwidth usage.
If your sitemap is too large, you can check this option to avoid overloading your server.
- Include an XSLT stylesheet:
Allows you to specify a full or relative URL to an XSLT stylesheet. This stylesheet can be used to enhance the presentation of the sitemap when viewed in a web browser.
- Omit the base URL of the sitemap:
Use this option if your website is in a subdirectory and you want the sitemap to be located at the root of the domain.
It can improve indexing, but be careful, as it often requires modifications to the .htaccess file.
- Override the sitemap file name:
With this option, you can change the sitemap file name.
- Include the sitemap in HTML format.
Selecting this option will create a new page that displays the sitemap in a more visual manner for users.
These options might be more complex for the average user, but by following these guidelines and instructions, you’ll get a better idea of how to configure them in each case.
Step 4: Selection of Additional Pages
This section of the sitemap plugin allows you to add specific pages or URLs to the sitemap that are not part of your normal WordPress site structure.
This can be useful for including important pages that are outside the main WordPress installation, such as pages in a subdirectory or even on another related domain.

The fields to fill out to configure the additional pages are:
- Page URL: Enter the full URL of the page you want to add to the sitemap.
- Priority: Set the priority of the page relative to other pages. For example, the homepage might have a higher priority than an article page.
- Last Modified: Enter the date of the last change in YYYY-MM-DD format. This field is optional.
Step 5: Determine the Priority of Entries
In this section of the sitemap plugin, you can configure how the priority will be assigned to each page or entry on your website in the sitemap.
Priority is a way to indicate to search engines which pages are most important on your site.
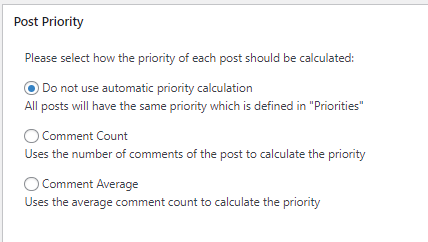
In this case, you can choose from 3 options:
- Do not use automatic priority calculation:
All entries will have the same priority. There will be no automatic calculation to determine which entries are more important.
You can manually select the priority in the “Priorities” section.
- Comment Counter:
This option uses the number of comments on an article to calculate its priority. The more comments an entry has, the higher its priority will be.
It’s useful for blogs and sites where user engagement is a good indicator of relevance.
- Average Comments:
The average number of comments is used to calculate the priority. This provides a priority based on the average number of comments across all your entries.
Once you have determined how you prioritize the entries in the sitemap, it’s time to choose the elements you want to include in it.
Step 6: Sitemap Content
A key part of this process is determining the parts of your website you want to appear in the sitemap. The XML Sitemap Generator for Google plugin allows you to choose from the following options:
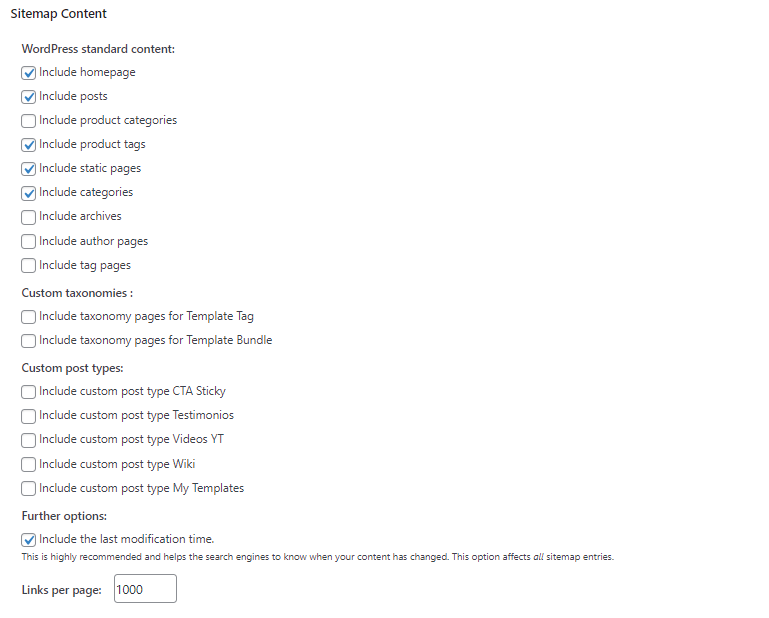
I recommend selecting the following checkboxes:
- Include homepage: It’s always important to include the homepage in the sitemap since it’s one of the most important pages on your site.
- Include posts: If you have a blog, including all posts is essential to ensure that all your content is indexed.
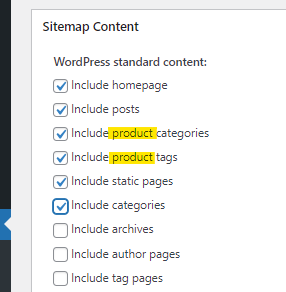
- Include product categories: If you have an online store, it’s useful to include product categories to improve the indexing of your catalog.
- Include product tags: Also relevant for online stores, as it helps search engines better understand the structure of your products.
- Include products: Fundamental for online stores to ensure all products are crawled and indexed.
- Include static pages: It’s important to include static pages so that all relevant pages of your site are indexed.
- Include last modified date: Highly recommended, as it informs search engines about recent updates to your content.
The other options you check will depend on your project and its characteristics.
For example, if your site has authoritative authors, it’s interesting to check the option to include author pages, as this way you will strengthen your EEAT.
Websites with downloadable files like PDFs, books, and even videos should consider checking the option to include files.
As for the number of links, it is advisable to set it to 1000, as this value ensures a balance between having manageable sitemap files and maximizing the number of links indexed per file.
Step 7: Use excluded elements
If you want to exclude any part of your website from the sitemap, this is the ideal time to do it.
In the excluded elements section, you can determine everything from categories you don’t want to index to specific posts.
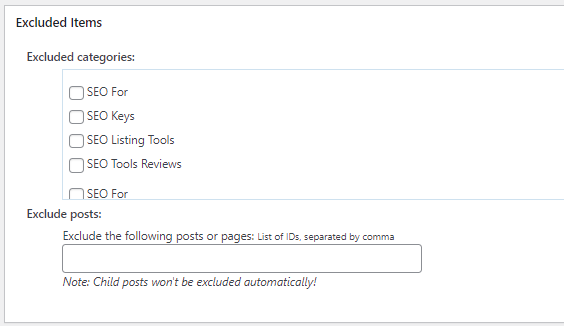
This is ideal if you have irrelevant content for users and no keywords but need to keep it on your site for any reason. A clear example could be an internal news category, which is only interesting for team members.
- Note: Nested articles will not be automatically excluded!
This means that if you exclude an article from the sitemap in this field, the articles attached to it will still be included in the sitemap.
Let’s say you have a page with ID 100 (“Products”) and two child pages with IDs 101 and 102 (“Product 1” and “Product 2”). If you only specify 100 in the exclusion field, only the “Products” page will be excluded.
To also exclude the child pages, you must write 100, 101, 102.
Step 8: Update change frequency
In the “Change Frequency” section, you can select how often you want crawlers to visit your website.
Try to match the frequency with which you publish content or make changes.
One very positive aspect of this section is that you can set different frequencies based on the content present on your website. Keep in mind that a section like the blog might need more frequent crawling than author pages.

Step 9: Determine Your Content Priorities
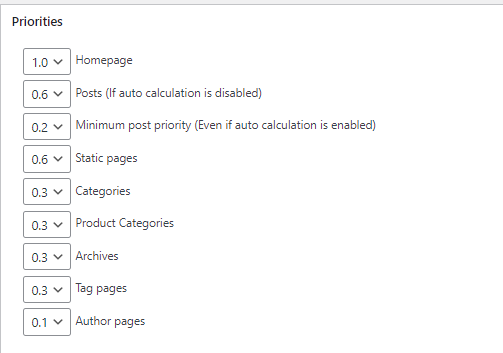
Additionally, in the next section “Priorities,” you can assign scores to value the importance of elements on your website so that Google understands it as well and set a priority order for crawling in the sitemap.
This way, you are telling Google which type of content you are most interested in indexing.
I recommend setting the minimum priority for sections like categories or tags.
Step 10: Submit the Sitemap to Google Search Console
After creating the XML Sitemap, you need to upload it to Search Console so that Google takes it into account. This is a very important step because otherwise, Google’s crawler might never detect it.
To do this, you need to submit a sitemap by following these instructions:
- Step 1: Log in to Google Search Console with your account and select the corresponding website.
- Step 2: Click on “Sitemaps” in the left-hand menu.
- Step 3: Enter the URL of the sitemap, usually “https://yourdomain.com/sitemap.xml“. You can find it at the top of the plugin settings.

- Step 4: Click on “Submit sitemap”.
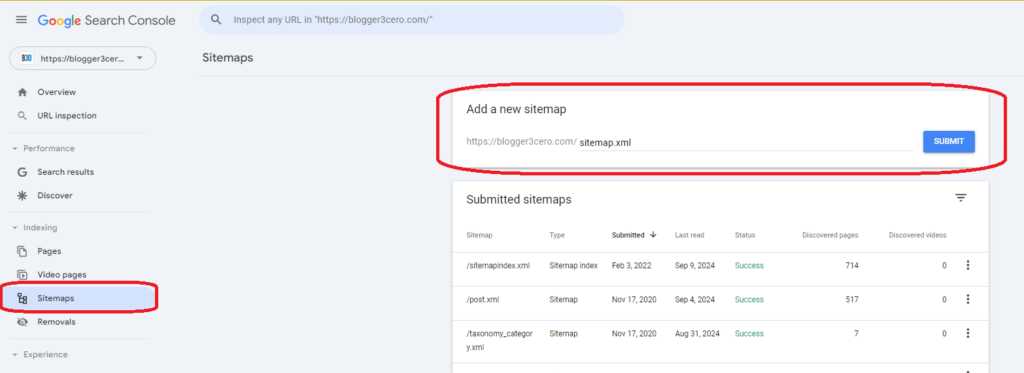
All set! Google will take a little time to verify it, but once it does, you will have the assurance that Google now knows the structure of your website’s URLs.
It’s a good idea to check in from time to time to see when the website crawls occur, in case you need to make changes to the Google XML Sitemap settings.
How to Configure an XML Sitemap for an Ecommerce
Regarding the configuration I explained above, you should ensure these options are met:
- Step 1: Include product categories, product tags, and your own products in the sitemap. This will help them appear in search results.
- Step 2: Update the change frequencies according to the updates you make in your ecommerce.
- Step 3: Modify the importance value so that the automatic priority calculation favors the products that are most interesting.
- Step 4: Submit the different product XML sitemaps to Google Search Console so that Google understands the hierarchy of your ecommerce URLs.
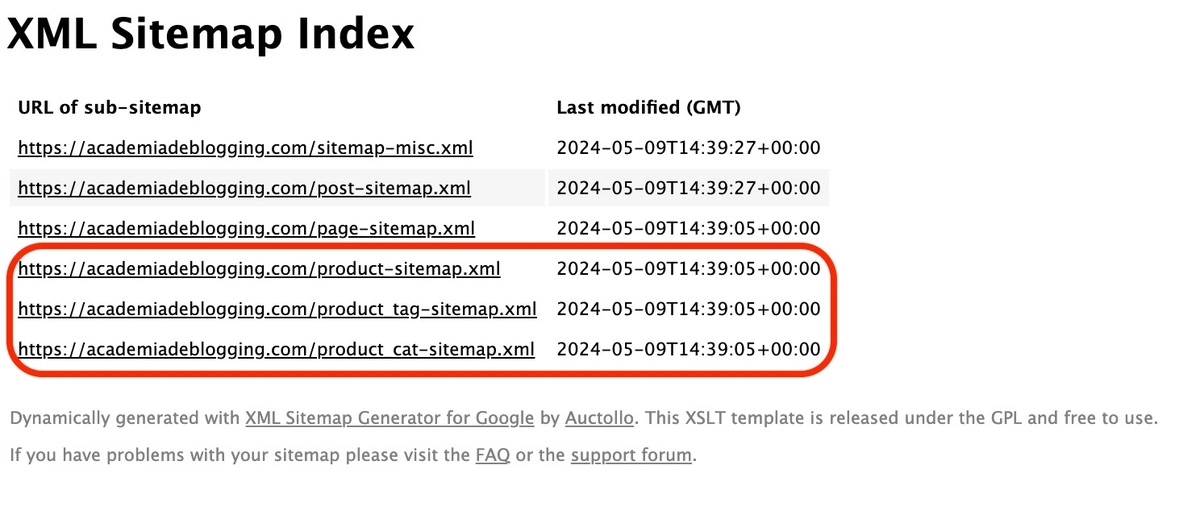
This way, the product pages of your online store will have a higher chance of being indexed and attracting potential buyers to your website.
How to Configure an XML Sitemap for News for Google News
If you have a news website, you can create an XML sitemap for indexing in Google News.
Google News is a Google application where current news from different media outlets is published, distinguishing this type of content in search results.
To create an XML sitemap to appear on this platform, follow these steps:
- Step 1: Download and activate a plugin compatible with XML Google Sitemaps aimed at creating Google News sitemaps.
I recommend using the plugin XML Sitemap & Google News.
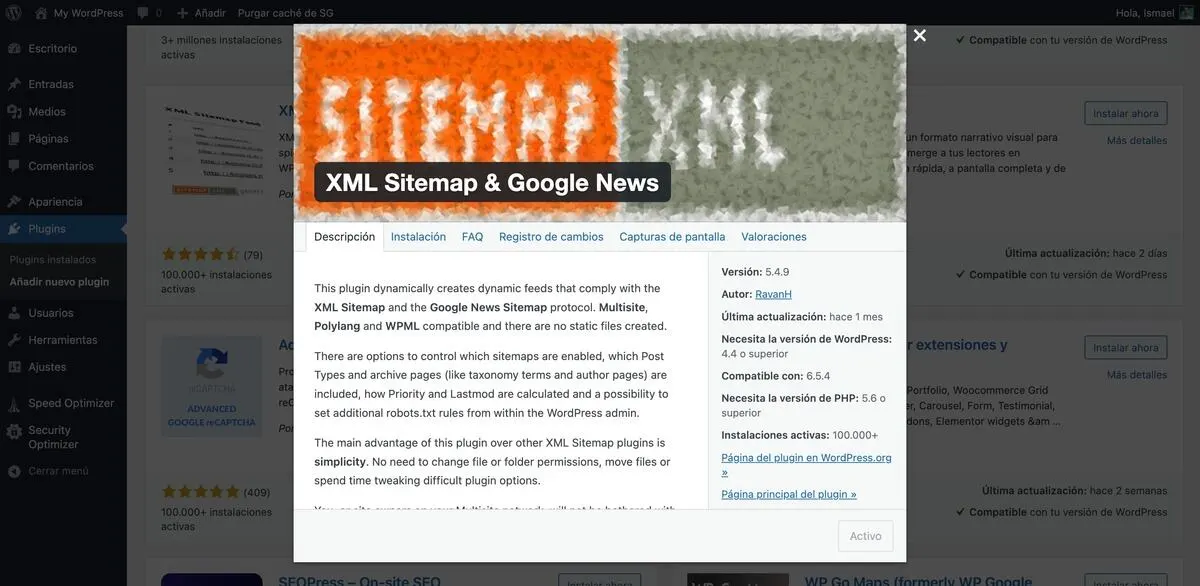
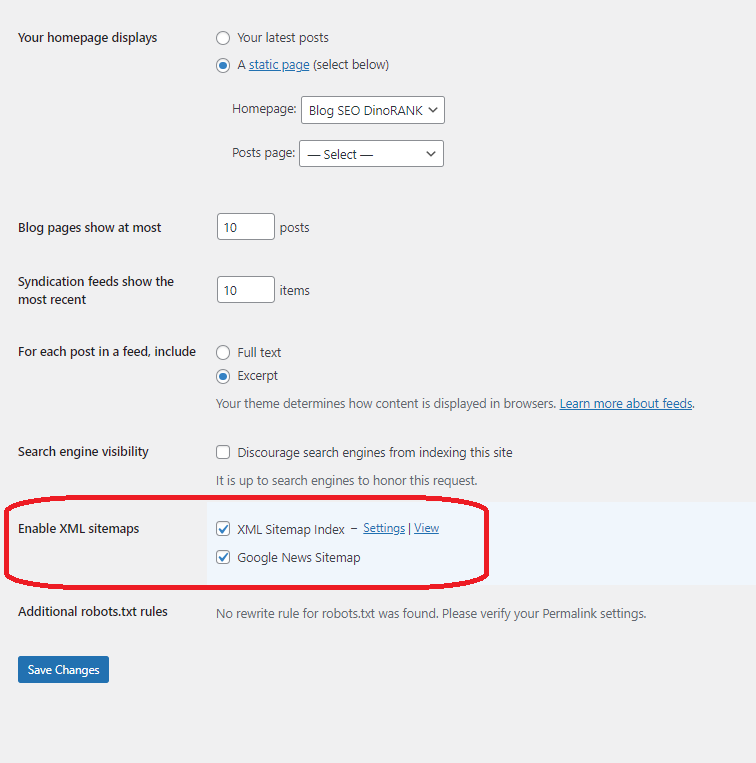
Step 2: Go to reading settings and enable both sitemaps.
WordPress detects a conflict between the Google Sitemaps plugin I showed earlier and the Google News sitemaps plugin. Therefore, you need to go to reading settings and enable these two options:
<li><strong>XML Sitemap Index.</strong></li>
<li><strong>Google News Sitemap.</strong></li>
</ul>
Step 3: Go to Settings > Google News.
Here you can set a default title for publications in Google News.
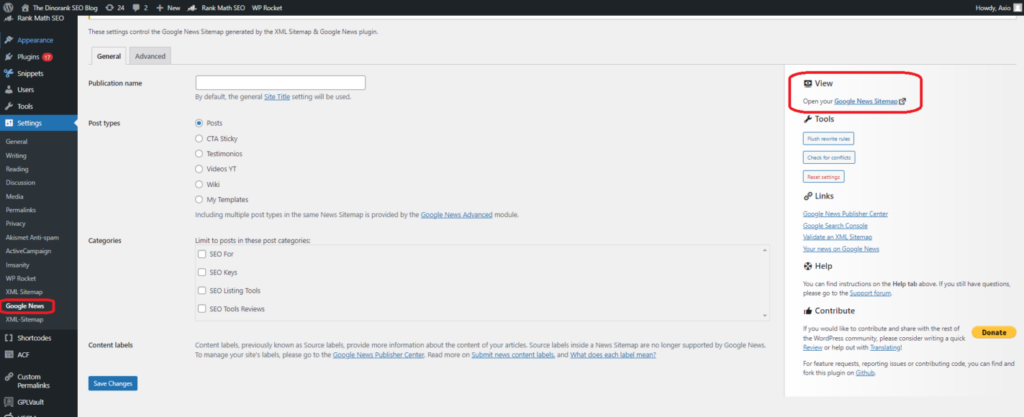
If you have article categories that are not current news, it’s advisable not to include them, as Google News has a format similar to a digital newspaper and will only publish your most up-to-date content.
Step 4: Upload the Google News sitemap to Search Console.
Copy the URL provided by your Google News sitemap plugin, which is usually https://yourdomain.com/sitemap-news.xml, and submit it as a regular sitemap through Google Search Console. This way, Google will know that your website is dedicated to publishing current news. Additionally, to ensure your content gets published, it’s also advisable to register at Google News Publisher Center with a Google account and manually add the URL of each news article.
This way, you will further encourage its publication.
How to Set Up a Local KML Sitemap
If you have a physical business, you might be interested in setting up a local KML sitemap to boost your website’s local SEO. Although these types of sitemaps are less significant than they were years ago, it’s a simple action that can give a small boost to your business’s ranking in local searches. To do this, create a local sitemap by going to a website that generates KML sitemaps for free, like https://www.geositemapgenerator.com/.
Once there, follow these steps:
Step 1: Enter your business information.
Once you enter the website and start generating the sitemap, a form will appear that you can fill out with your business information.
I advise you to use the same ones you use everywhere the brand is present to optimize the NAPU (Name, Address, Phone, URL).
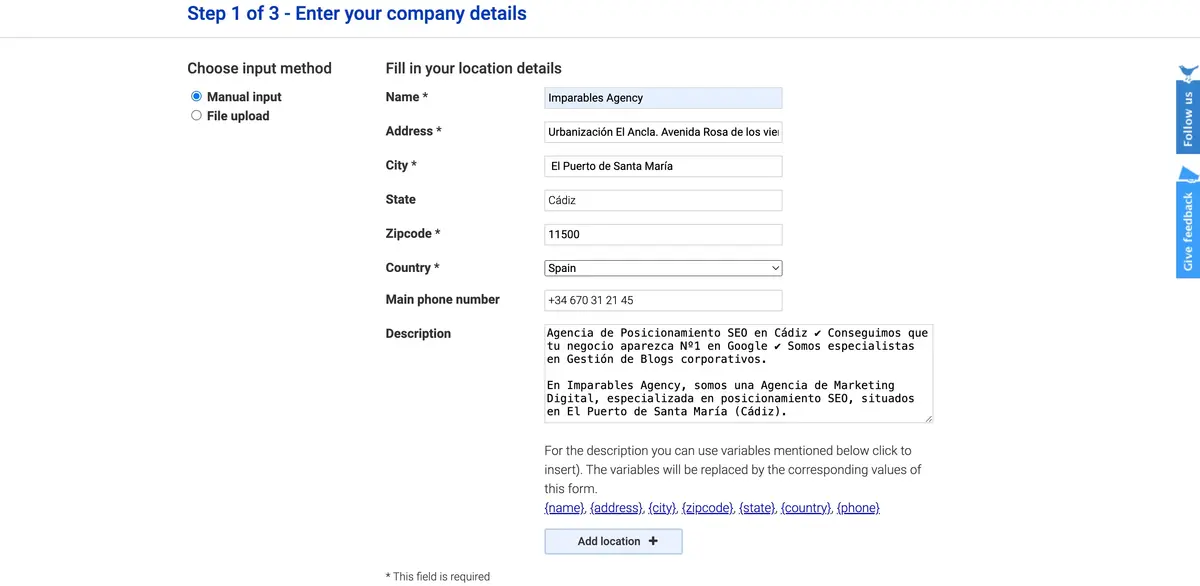
- Step 2: Complete the remaining fields to configure the local sitemap.
- Step 3: Download the sitemap.KML file and upload it to your website’s server.
- Step 4: Submit the local sitemap URL to Google Search Console. Generally, it will be https://yourdomain.com/locations.kml.
And that’s it, you will have your local sitemap generated. Keep in mind that this action is becoming less relevant for local SEO, but it never hurts to do it.
Correctly configuring the XML sitemap will help improve your website’s indexing
Now you know how to create an XML sitemap on your website and what other sitemap formats are and how to create them.
It’s a simple process thanks to plugins like the one we discussed: Google XML Sitemaps.
I hope I have helped you understand what an XML sitemap is and how to configure it like a professional.
Share your questions and experiences in the comments 🙂

